筆者最近在部署 Kubernetes 過程中,好奇每個元件究竟安裝與不安裝對 Kubernetes 造成什麼影響?CoreDNS 主要的功能之一是當 Pods 做套件更新或安裝時,可以提供 DNS Forward 功能,將請求轉發至外部進行 Domain 解析,並從正確的位址下載套件進行安裝。
本篇就聚焦在 CoreDNS 將 Pods 的請求轉發至外部 DNS Server 進行解析的運作流程。
問題描述 首先先檢視當前 Kubernetes 上運行的 Pods。
1
2
3
4
5
6
7
8
9
10
11
12
13
14
15
16
17
18
19
20
21
$ kubectl get po -A -o wide NAMESPACE NAME READY STATUS RESTARTS AGE IP NODE NOMINATED NODE READINESS GATES calico-system calico-kube-controllers-56689cf96-wlv2h 1/1 Running 0 22h 192.168.11.0 k8s-m3 <none> <none> calico-system calico-node-57fd5 1/1 Running 0 22h 192.168.20.11 k8s-m2 <none> <none> calico-system calico-node-hl589 1/1 Running 0 22h 192.168.20.13 k8s-n1 <none> <none> calico-system calico-node-k7w68 1/1 Running 0 22h 192.168.20.12 k8s-m3 <none> <none> calico-system calico-node-mgxwl 1/1 Running 0 22h 192.168.20.10 k8s-m1 <none> <none> calico-system calico-node-sckxv 1/1 Running 0 22h 192.168.20.14 k8s-n2 <none> <none> calico-system calico-typha-5bc9cc898d-4drrk 1/1 Running 0 22h 192.168.20.14 k8s-n2 <none> <none> calico-system calico-typha-5bc9cc898d-l9hrw 1/1 Running 0 22h 192.168.20.10 k8s-m1 <none> <none> calico-system calico-typha-5bc9cc898d-r2knp 1/1 Running 0 22h 192.168.20.13 k8s-n1 <none> <none> calico-system calico-typha-5bc9cc898d-zfnlv 1/1 Running 0 22h 192.168.20.12 k8s-m3 <none> <none> default nginx-deployment-66b6c48dd5-kwmkx 1/1 Running 0 5h3m 192.168.111.194 k8s-n2 <none> <none> default nginx-deployment-66b6c48dd5-lssjq 1/1 Running 0 5h3m 192.168.215.65 k8s-n1 <none> <none> kube-system kube-proxy-7vn8h 1/1 Running 0 22h 192.168.20.14 k8s-n2 <none> <none> kube-system kube-proxy-8mxrg 1/1 Running 0 22h 192.168.20.12 k8s-m3 <none> <none> kube-system kube-proxy-gzrlh 1/1 Running 0 22h 192.168.20.13 k8s-n1 <none> <none> kube-system kube-proxy-swk6f 1/1 Running 0 22h 192.168.20.11 k8s-m2 <none> <none> kube-system kube-proxy-zmnv8 1/1 Running 0 22h 192.168.20.10 k8s-m1 <none> <none> tigera-operator tigera-operator-b6c4bfdd9-jgl2d 1/1 Running 1 22h 192.168.20.11 k8s-m2 <none> <none>
在尚未安裝 CoreDNS 情境時,您會發現在任一個 Pod 內無法向外部資源進行存取。
這邊筆者先建立一個 Nginx 的 Deployment,並且進去其中一個 Pod 執行 apt update 指令,這時候會發現如下的情況:
1
2
3
$ kubectl exec -ti nginx-deployment-66b6c48dd5-kwmkx bash $ apt update 0% [Connecting to deb.debian.org] [Connecting to security.debian.org]
問題在於無法解析 Ubuntu 套件 Domain,因此無法正常更新套件與安裝套件。
解決方法 回想一下,不管在安裝 Master Node 或 Worker Node 時,都會啟動 Kubelet,並且帶入 --config=/var/lib/kubelet/config.yml 參數。
在 /var/lib/kubelet/config.yml 檔案內會需要配置 clusterDNS。這就是運行在這個節點上的 Pods 預設的 DNS Server。
1
2
3
4
5
6
7
8
9
10
11
12
13
14
15
16
17
18
19
20
21
22
23
24
25
26
27
28
29
30
31
32
33
34
35
36
37
38
39
40
41
42
43
44
45
46
47
48
49
50
51
52
53
54
55
56
57
58
59
60
61
62
63
64
65
66
67
68
69
70
71
72
$ cat /var/lib/kubelet/config.yml apiVersion: kubelet.config.k8s.io/v1beta1 kind: KubeletConfiguration address: 0.0.0.0 port: 10250 readOnlyPort: 10255 authentication: anonymous: enabled: false webhook: cacheTTL: 2m0s enabled: true x509: clientCAFile: /etc/kubernetes/pki/ca.pem authorization: mode: Webhook webhook: cacheAuthorizedTTL: 5m0s cacheUnauthorizedTTL: 30s cgroupDriver: cgroupfs cgroupsPerQOS: true clusterDNS: - 10.96.0.1 // HERE clusterDomain: cluster.local containerLogMaxFiles: 5 containerLogMaxSize: 10Mi contentType: application/vnd.kubernetes.protobuf cpuCFSQuota: true cpuManagerPolicy: none cpuManagerReconcilePeriod: 10s enableControllerAttachDetach: true enableDebuggingHandlers: true enforceNodeAllocatable: - pods eventBurst: 10 eventRecordQPS: 5 evictionHard: imagefs.available: 15% memory.available: 100Mi nodefs.available: 10% nodefs.inodesFree: 5% evictionPressureTransitionPeriod: 5m0s failSwapOn: true fileCheckFrequency: 20s hairpinMode: promiscuous-bridge healthzBindAddress: 127.0.0.1 healthzPort: 10248 httpCheckFrequency: 20s imageGCHighThresholdPercent: 85 imageGCLowThresholdPercent: 80 imageMinimumGCAge: 2m0s iptablesDropBit: 15 iptablesMasqueradeBit: 14 kubeAPIBurst: 10 kubeAPIQPS: 5 makeIPTablesUtilChains: true maxOpenFiles: 1000000 maxPods: 110 nodeStatusUpdateFrequency: 10s oomScoreAdj: -999 podPidsLimit: -1 registryBurst: 10 registryPullQPS: 5 resolvConf: /etc/resolv.conf rotateCertificates: true runtimeRequestTimeout: 2m0s serializeImagePulls: true staticPodPath: /etc/kubernetes/manifests streamingConnectionIdleTimeout: 4h0m0s syncFrequency: 1m0s volumeStatsAggPeriod: 1m0s
如上述情境,若在這個 Worker Node 上運行一個 Pod,預設 DNS Server 為 10.96.0.10。
實際我們進入 nginx-deployment-66b6c48dd5-kwmkx Pod,並且檢視 /etc/resole.conf 檔案。
1
2
3
4
5
6
$ kubectl exec -ti nginx-deployment-66b6c48dd5-kwmkx bash $ cat /etc/resolv.conf nameserver 10.96.0.10 search default.svc.cluster.local svc.cluster.local cluster.local options ndots:5
由上述結果可以看出 Pod 會採用 10.96.0.10 作為預設 DNS Server。
接著我們就必須利用 CoreDNS 啟動時,使用 10.96.0.10 作為 ClusterIP,將所有 Pods 請求 Forward 到外部 8.8.8.8 進行 Domain 解析。
因此在啟動 CoreDNS 時需要在 ConfigMap 中加入 forward . 8.8.8.8:53 配置,並且在 Service 將 ClusterIP 設定為 10.96.0.10。
1
2
3
4
5
6
7
8
9
10
11
12
13
14
15
16
17
18
19
20
21
22
23
24
25
26
27
28
29
30
31
32
33
34
35
36
37
38
39
40
41
42
43
44
45
46
47
48
49
50
51
52
53
54
$ cat coredns.yml ... apiVersion: v1 kind: ConfigMap metadata: name: coredns namespace: kube-system data: Corefile: | .:53 { errors health { lameduck 5s } ready kubernetes cluster.local in-addr.arpa ip6.arpa { fallthrough in-addr.arpa ip6.arpa } prometheus :9153 forward . 8.8.8.8:53 cache 30 loop reload loadbalance } ... apiVersion: v1 kind: Service metadata: name: kube-dns namespace: kube-system annotations: prometheus.io/port: "9153" prometheus.io/scrape: "true" labels: k8s-app: kube-dns kubernetes.io/cluster-service: "true" kubernetes.io/name: "CoreDNS" spec: selector: k8s-app: kube-dns clusterIP: 10.96.0.10 ports: - name: dns port: 53 protocol: UDP - name: dns-tcp port: 53 protocol: TCP - name: metrics port: 9153 protocol: TCP
配置完成後建立 CoreDNS 服務。
1 $ kubectl create -f coredns.yml
啟動完成後,檢視當前所有 Serivce 狀態。
1
2
3
4
5
6
$ kubectl get svc -A NAMESPACE NAME TYPE CLUSTER-IP EXTERNAL-IP PORT(S) AGE calico-system calico-typha ClusterIP 10.105.208.37 <none> 5473/TCP 22h default kubernetes ClusterIP 10.96.0.1 <none> 443/TCP 28h kube-system kube-dns ClusterIP 10.96.0.10 <none> 53/UDP,53/TCP,9153/TCP 4h39m
由上述可以看出 CoreDNS 已經被啟動,並且 ClusterIP 為 10.96.0.10。
最後,我們在進入 nginx-deployment-66b6c48dd5-kwmkx Pod 再次進行套件更新。
1
2
3
4
5
6
7
8
9
10
11
12
13
14
15
16
$ kubectl exec -ti nginx-deployment-66b6c48dd5-kwmkx bash $ apt update Ign:1 http://deb.debian.org/debian stretch InRelease Get:2 http://security.debian.org/debian-security stretch/updates InRelease [53.0 kB] Get:3 http://deb.debian.org/debian stretch-updates InRelease [93.6 kB] Get:4 http://security.debian.org/debian-security stretch/updates/main amd64 Packages [649 kB] Get:5 http://deb.debian.org/debian stretch Release [118 kB] Get:6 http://deb.debian.org/debian stretch-updates/main amd64 Packages [2596 B] Get:7 http://deb.debian.org/debian stretch Release.gpg [2410 B] Get:8 http://deb.debian.org/debian stretch/main amd64 Packages [7080 kB] Fetched 7998 kB in 24s (332 kB/s) Reading package lists... Done Building dependency tree Reading state information... Done 25 packages can be upgraded. Run 'apt list --upgradable' to see them.
由上述可以看出現在 Pod 已經可以至外部進行套件更新與安裝。
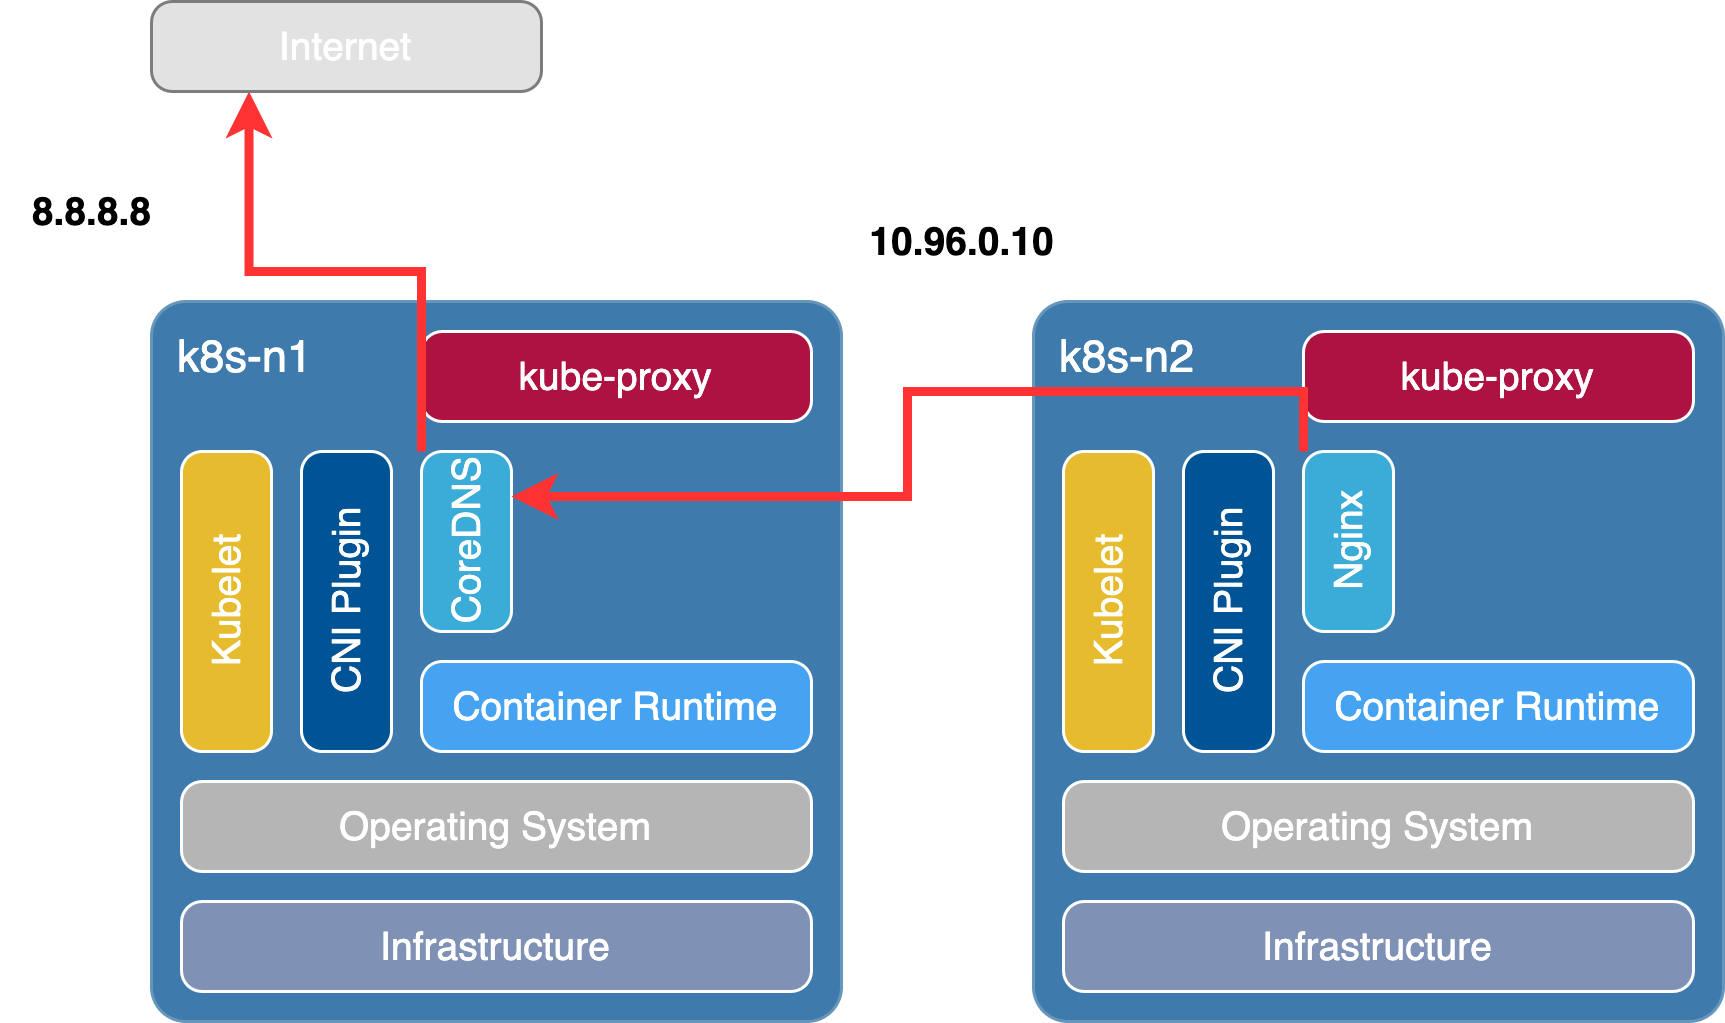
總結 由下圖來解釋上述所做的行為,在 Nginx Pod 內下 apt update 指令時,請求根據 DNS Server 轉發至 CoreDNS Pod(10.96.0.10),再由 CoreDNS Pod 將請求 Forward 到外部 DNS Server(8.8.8.8) 進行解析。因此就可以在 Pod 內正常進行套件的更新與安裝等行為。
若針對本篇教學有任何疑問或有敘述錯誤的地方,歡迎在底下留言討論唷~
